Reviving a G4 on a PowerPC Mac Mini
Installing and Using Mac OS 9 on a PowerPC Mac Mini
One of the services CARE Typography offers is the translation of older Adobe PageMaker files to newer InDesign files. What I have used in the past is a series of programs downloaded on a Mac Mini PowerPC with system Mac OS X 10.4.11. I open the PageMaker file in the Classic (OS 9) mode on that system, usually save it as a PageMaker 6.5 file and then port that file into an InDesign CS 6 program on another Mini. And then translate that into a modern InDesign file. While all of this is not that time consuming, it is tedious.
I then found a program by Ross Darker (http://macos9lives.com/smforum/index.php?topic=4365.0) that would allow me to install a Mac OS 9.2.2 system on my PowerPC Mac Mini. After spending about a week on downloading files, partitioning the drive on the Mac Mini and seeking to install the Mac OS 9 system onto a partition on my hard drive there, and becoming frustrated with the Mac defaulting to the OS X 10.4.11 system and the cursor hanging on the OS 9 screen multiple times, I finally found a way to install and use Mac OS 9.2.2 on my Mac Mini PowerPC.
Why do all of this work? It saves me loads of time and effort. The PageMaker programs are made for OS 9 and I can use InDesign 2.0 (an older InDesign iteration) to transfer the files and then open them up in a newer InDesign format. The point is that this process is seamless and FAST!! My OS 9 on my PowerPC Mac Mini is blazingly fast and efficient. This is how I did it. . .
- I used CarbonCloner (https://bombich.com) to migrate my OS 10.4.11 drive to an external Firewire drive. This freed up the drive on my Mac Mini so that I could install the OS 9 on it without any other files. It also allowed me to automatically open up Mac OS 9 on the Mini when I turn the computer on. (The files I migrated to an external Firewire hard drive show up on the OS 9 Finder as another drive, fully accessible to me because of the Firewire connection to the Mac.) Then, if you want to follow suit . . .
- Download and install Ross Darker's Mac OS 9.2.2 version 9 for Mac mini G4 with TOAST/ISO Image. Note that you need to open this using a file expander (Stuffit at https://www.stuffit.com) and then write the file on a CD so that you can install via a CD disk onto the Mini drive. (Details below)
- Download and install usable Mac OS 9 programs from Macintosh Garden or older program disks you own and have available. (I downloaded my PageMaker programs onto the OS 9 system as well as a number of others that I use quite regularly. I also downloaded InDesign 2.0 onto the OS 9 drive.)
- Tweak the OS 9 final system, making sure all the programs you have installed work flawlessly and well. This is an important step, since some programs require installation of a number of other OS 9 programs before their installation. This is sometimes a trial-and-error process and can be time consuming until you get it right. (An instance of this is the necessary installation of font files for some programs through Adobe ATM Manager. I would recommend this instead of Suitcase. Those fonts may need translated into Postscript One font files so that they are readable in the OS 9 system.)
- Voilå! You have a fully functioning and FAST Mac OS 9 system on your PowerPC Mac Mini.**
About the OS 9 Install . . .
A bootable install CD of Mac OS 9.2.2 for the Mac mini G4
Thanks to RossDarker for his "Mac mini G4 Mac OS 9.2 (V9)" CD image. Thanks also to ELN for the custom Mac OS ROM used in this, and darthnVader for the custom ATI Graphics Drivers.
How to use: Burn the image to CD-R, insert disc into a Mac mini DVD drive, hold the "C" key down as you boot up the mini. When you see the Mac smiley face arrive you can release the "C" key. Read the important brief on board instructions and run the installer, then post-install items. This install CD image is intended for use in Mac mini 1.25, 1.33, 1.42, 1.5 GHz, G4 models only.
Compatibility: Architecture: PPC PPC (Carbonized)
NOTES
There are two versions of Drive Setup included in the CD's Utilities folder; v1.9.2 and v2.0.7 (the latter without a version number in its file name). Drive Setup v1.9.2 is the utility you must use if you want to format FireWire disks, newer versions of Drive Setup will not format FW drives. Drive Setup 2.0.7 is the better choice to use if you intend to reformat Mac mini's internal HD.
Sound is only available via the audio output jack. That is, the Sound Control Panel does not work (no System beeps). You will need to use external headphones or speakers for audio playback plugged into the jack. (This is due to the fact that you are installing into a "Power Mac G4 Cube" which has no sound in its architecture.)
The Apple System Profiler will report the model name as a "Power Mac G4 Cube". This is due to the custom ROM used by the installed OS. (SEE Image Below)
This install CD is (mostly) exactly what you get if you install the Universal Mac OS 9.2.2 disk. So there are no frills, you will need to add your own apps and nice touches to improve what's here. For example, QuickTime 5 and CarbonLib 1.5 are installed and you may want to update those (or not).
**(Interesting what Everyman.com lists as the "fastest" Mac to run OS 9 — "You are not alone in your desire to continue to use MacOS 9 applications. There probably are others who also are interested in the idea of having a pure MacOS 9 system for dedicated "legacy" use. The short answer to your question is that the Power Macintosh G4/1.25 DP "Mirrored Drive Doors" is the fastest stock Mac capable of booting in MacOS 9." However, with Mac OS 9 loaded onto my G4 Mac Mini, this setup proves faster, with 1.417 MHz processor.)
IMAGES
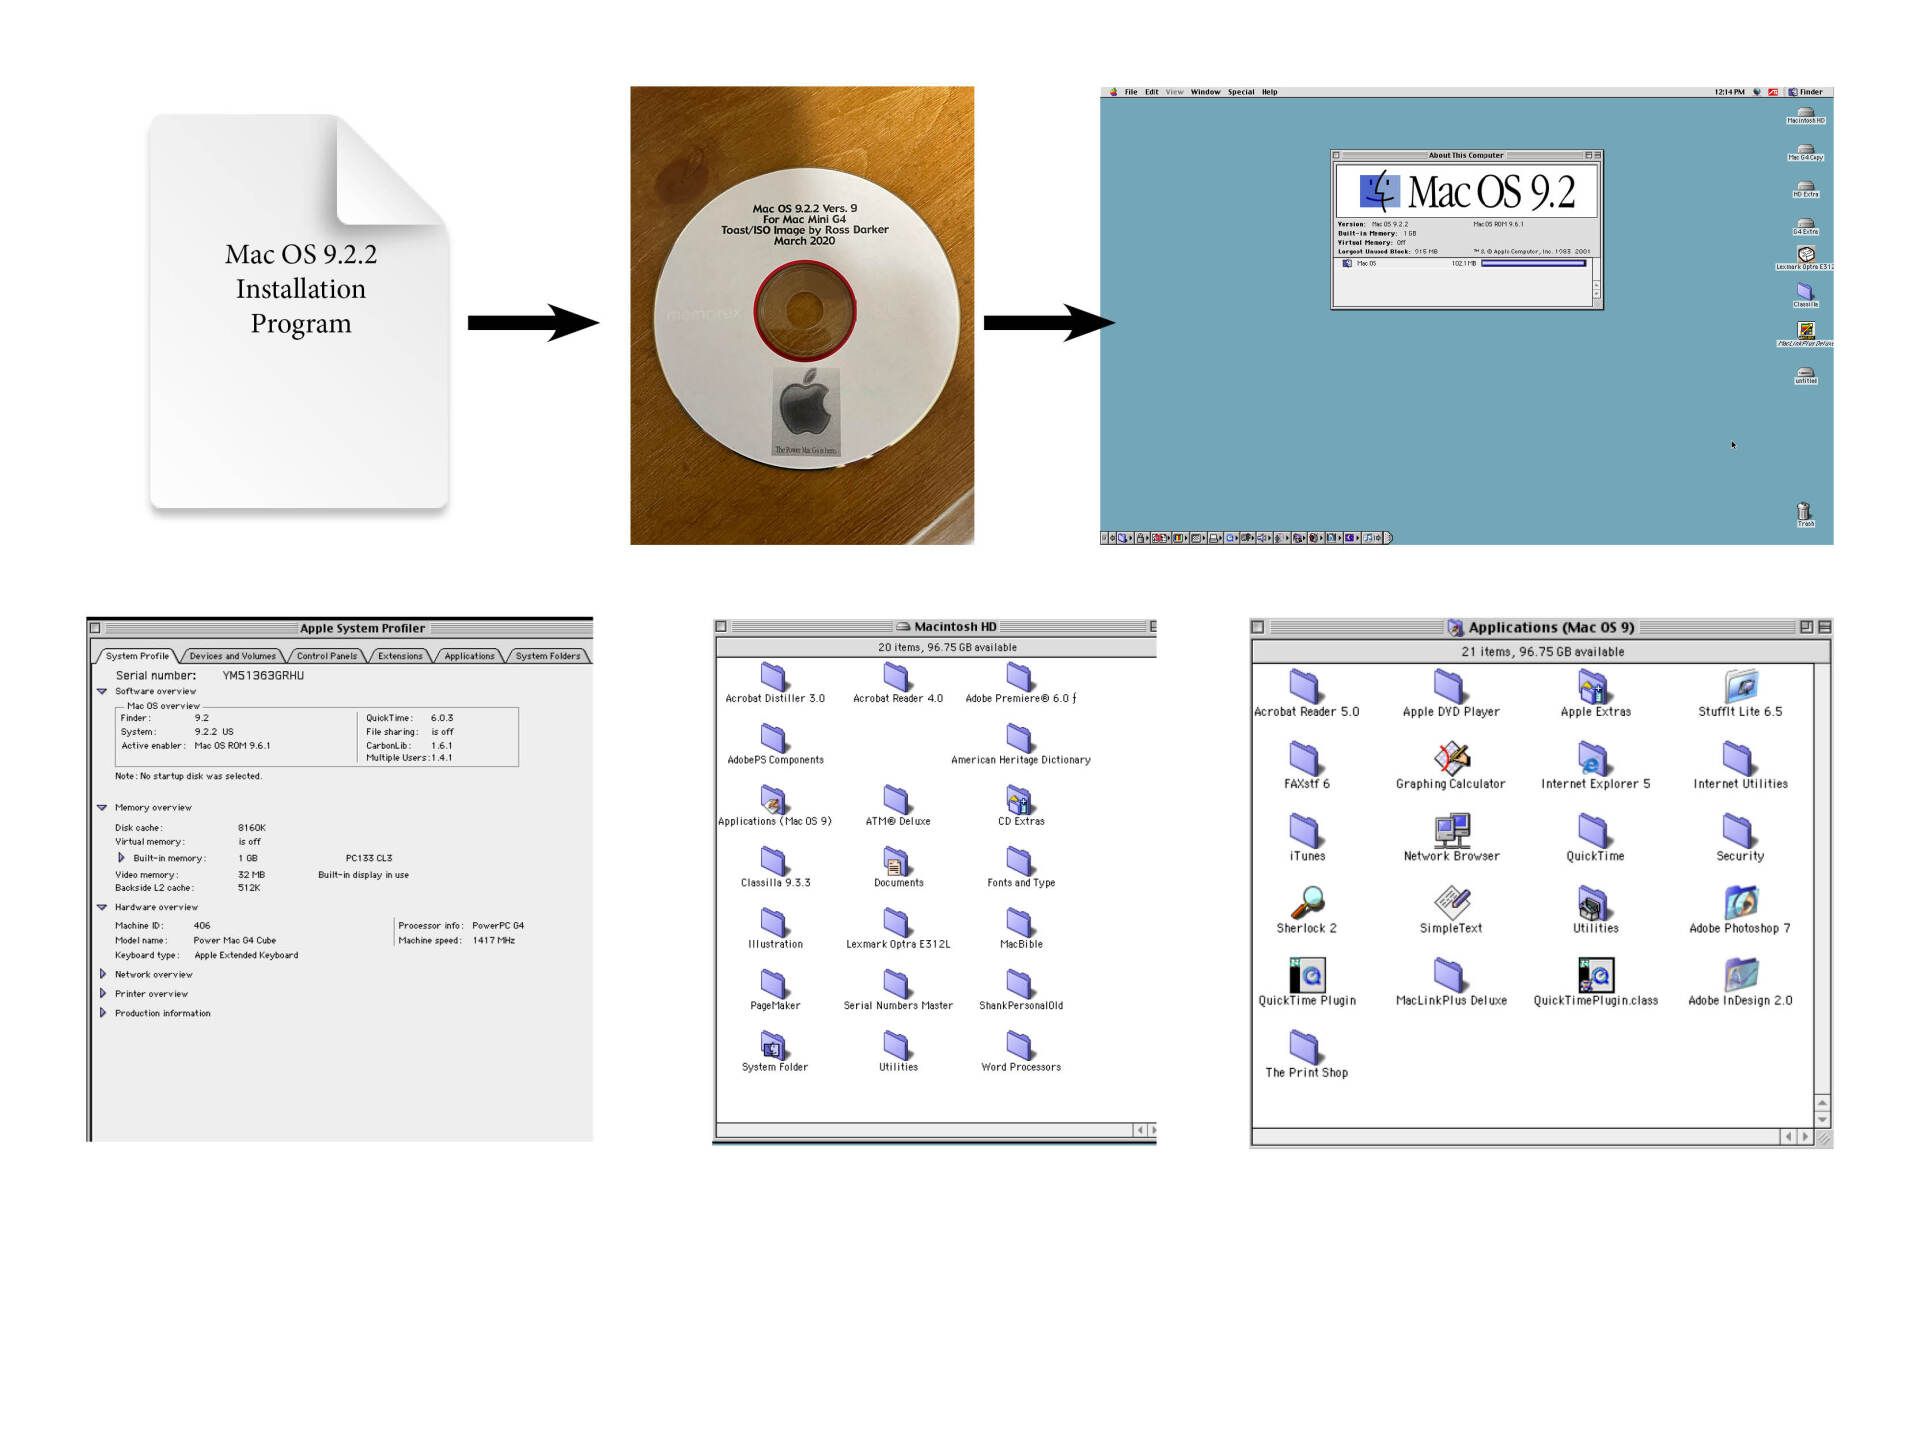
Successful Layout & Design